Everything you need to set up Kapatagan Site Insights, step by step, from installing the plugin to asking your AI assistant about your site. No coding needed. If a step is confusing, tell us and we’ll fix the guide.
Jump to: Before you start · 1. Install · 2. Connect your data · 3. Your first check-up · 4. Connect your AI assistant · 5. Other apps · 6. Settings · Problems and fixes · Staying safe
Before you start
Setting up the plugin and reading your reports takes about 15 minutes. Connecting an AI assistant takes another 15. Here’s what you need:
- A WordPress site with WordPress 6.0 or newer and PHP 7.4 or newer, and an administrator account.
- Site Kit by Google (free), connected to Search Console and Google Analytics. This is where your Google numbers come from. Already using Site Kit? Nothing extra to set up.
- Jetpack with Stats (optional). Adds visits, top posts and referrers.
- For the AI connection only: WordPress 6.9 or newer, and Claude Desktop on a Mac or Windows computer.
Good to know: the plugin only reads. Nothing in it can change your posts, pages or settings, and it never sends your data to Kapatagan.
1. Install the plugin
- In your WordPress dashboard, go to Plugins → Add New Plugin.
- Search for Kapatagan Site Insights once it’s listed on WordPress.org. Until then, click Upload Plugin and choose the .zip file you received.
- Click Install Now, then Activate.
- A new Kapatagan Site Insights menu appears on the left, with five screens: Overview, Settings, Setup check, Visibility and App access.
2. Connect your data
Site Insights doesn’t collect statistics itself. It reads them from Site Kit and Jetpack, which you may already have. Anything not connected is simply skipped, and the rest keeps working.
- Go to Kapatagan Site Insights → App access and scroll to Where the numbers come from. Each source has a green dot when it’s connected.
- If Site Kit isn’t installed yet, click its Install button there and confirm. It installs the official plugin from WordPress.org.
- Open Site Kit in the left menu and follow its setup: sign in with the Google account that owns your site, then connect Search Console and Analytics. Google may take a day or two to show data for a brand-new connection.
- Optional: install Jetpack, connect it to WordPress.com and turn on Stats.
- Come back to App access. The sources you connected now show connected.
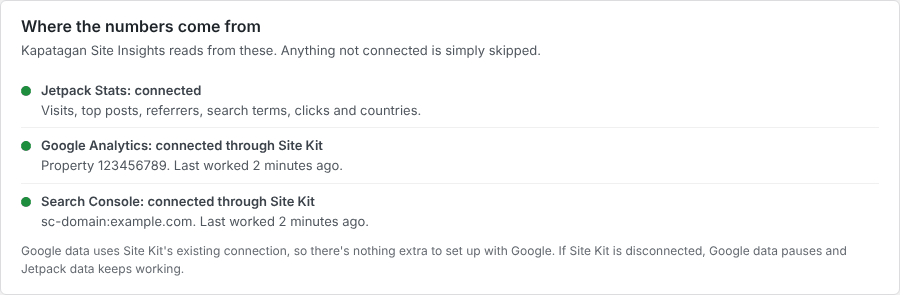
Site Insights uses Site Kit’s existing Google connection, so there’s no separate Google setup and no extra Google account to share. If Site Kit is ever disconnected, Google numbers pause and Jetpack numbers keep working.
3. Your first check-up
The Overview
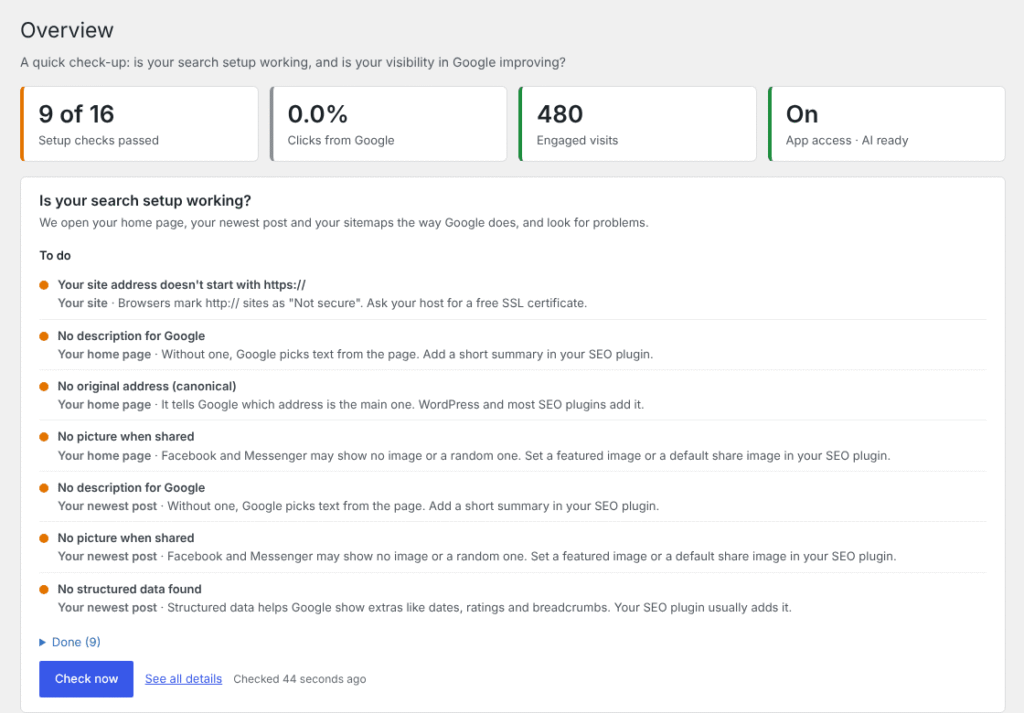
Open Kapatagan Site Insights → Overview. The four boxes at the top give you the quick answer: how many setup checks passed, how your Google clicks changed, your engaged visits, and whether app and AI access are on. Click any box to see the details behind it.
Setup check: is Google seeing your site properly?
- Click Check now. In about half a minute it opens your home page, your newest post and your sitemaps the way Google does.
- Read the To do list. Each item says what’s wrong, on which page, and what to do. For example: “No description for Google: add a short summary in your SEO plugin.”
- Fix what you can, then click Check now again. Passed items move to Done.
It works with any SEO plugin and changes nothing on your site. To check one particular page, or an old address to see where it now leads, use Setup check → Check another address.
Visibility: are more people finding you in Google?
Open Visibility. It has three parts, each with its own button:
- Before and after (Compare now): your Google clicks, times shown, click rate and average position for the latest 4 weeks against the 4 weeks before, plus the pages that gained or lost the most. Changed something on a certain day, like a new theme or SEO plugin? Set that day in Settings → Search comparison to compare before and after it.
- Engaged visits (Update): visits that lasted 10 seconds or more, opened 2 or more pages, or did something you track in Google Analytics. They leave out most bots, so they’re more trustworthy than total visits.
- Articles to look at (Find articles): see the next section.
Articles to look at
Click Find articles. You get two lists:
- Losing Google clicks. Each article comes with what moved, in plain words. “Shown less often, so fewer people searched for it” is normal for news once interest fades. “Appears lower in Google” or “Google stopped showing it” deserve a closer look. The searches that dropped are listed under each one.
- Shown often, rarely clicked. Articles Google shows a lot, but that get fewer clicks than your site usually gets at that position. A clearer title and description often help.
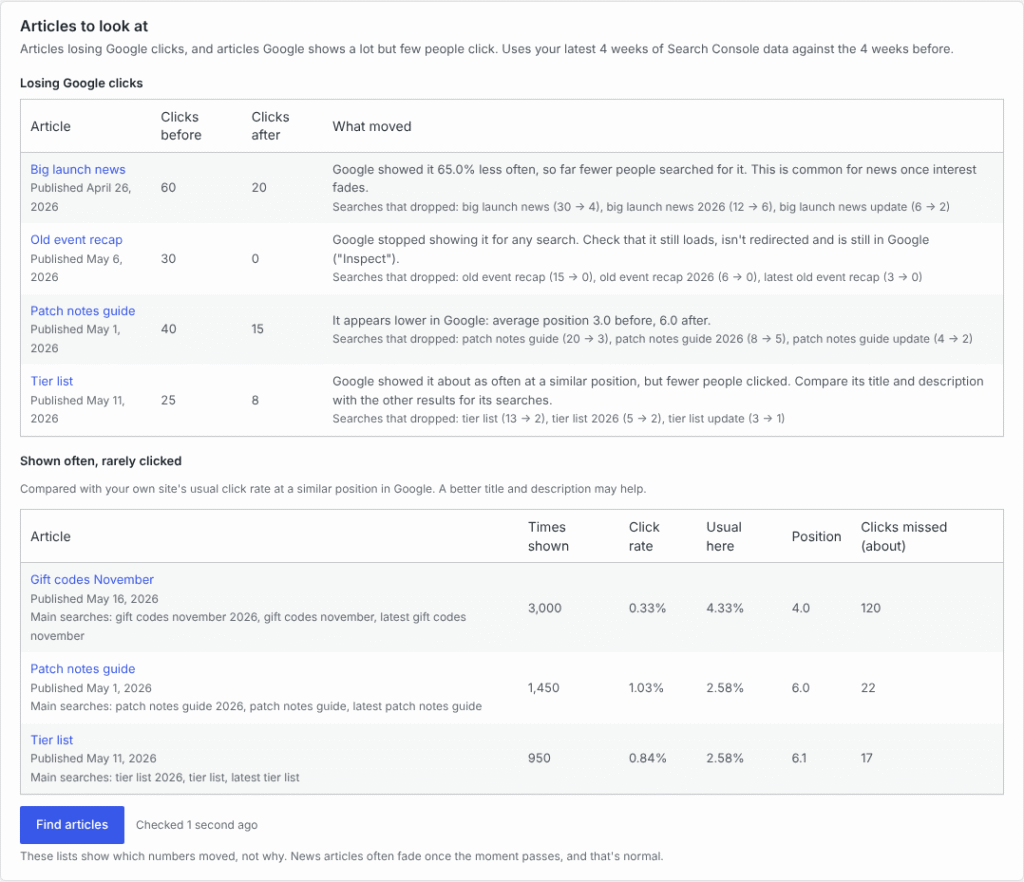
Tip: these lists show which numbers moved, not why. Google results move for many reasons, so look at a few weeks before changing an article.
4. Connect your AI assistant
Once connected, you can ask Claude things like “Which articles should I update this week?” and it answers from your site’s real numbers. This part is the most technical, so take it one step at a time. It’s tested with Claude Desktop; more AI apps are planned.
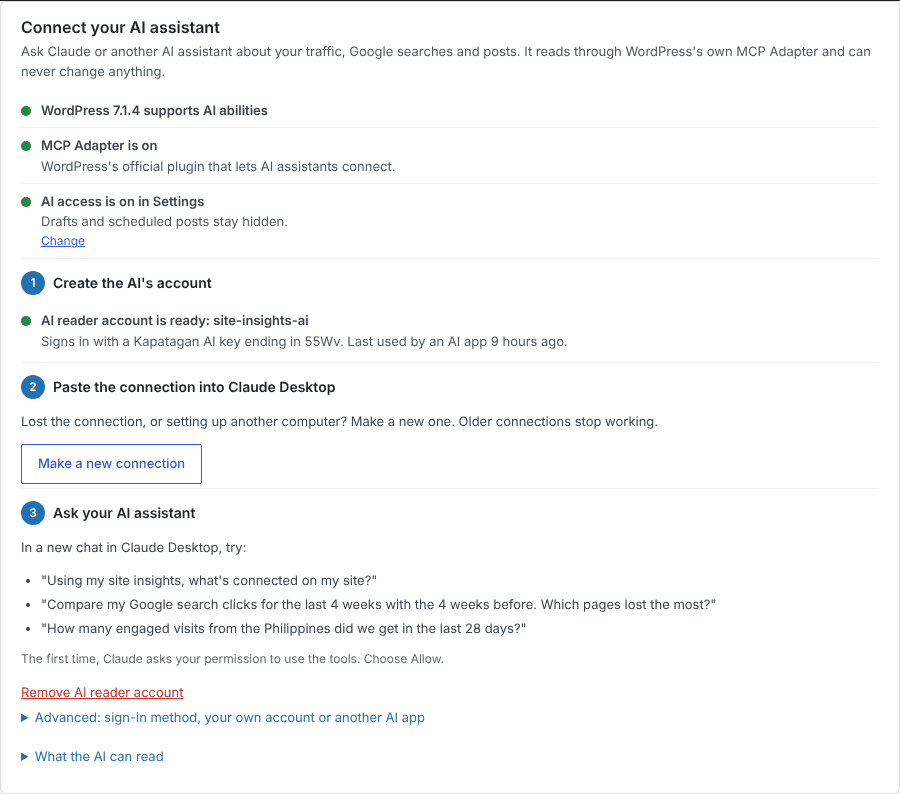
Everything starts on Kapatagan Site Insights → App access, in the card Connect your AI assistant. Its checklist shows what’s ready with green dots.
Step 1: Get the checklist green
- WordPress 6.9 or newer. If it asks you to update, go to Dashboard → Updates. Back up your site first.
- MCP Adapter. WordPress’s official, free plugin that lets AI assistants connect. Click Install MCP Adapter and confirm.
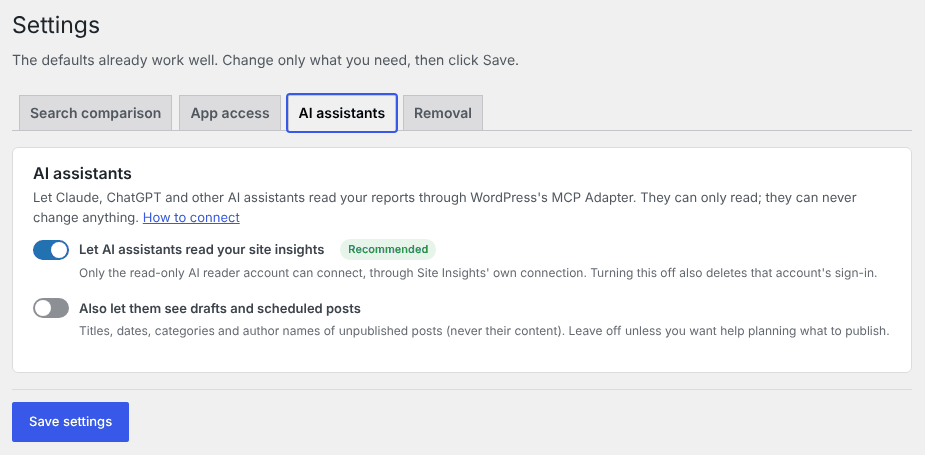
- AI access is on. Go to Settings → AI assistants, turn on Let AI assistants read your site insights and click Save settings. Leave drafts and scheduled posts off unless you want help planning what to publish.
Step 2: Create the AI’s account
Click Create AI reader account. This makes a separate account just for your AI assistant. It can read these reports and nothing else: it can’t log in to your dashboard, see your users or change anything, and WordPress refuses it everywhere outside Site Insights.
Seeing “One more step: choose how your AI app signs in”? Your site’s security settings (for example Wordfence) have turned off WordPress Application Passwords, which AI apps normally use. You have two choices:
- A. Keep them off and use a Kapatagan AI key (recommended if you’re unsure). Your security settings stay exactly as they are. The key signs in only the read-only AI account, works only on the AI connection address and only over https, and can be replaced or removed any time.
- B. Turn Application Passwords on in your security plugin. This is WordPress’s own way.
Step 3: Install Node.js on your computer
Claude Desktop uses a small free program called Node.js to connect to your site. You only do this once per computer.
- Go to nodejs.org and download the LTS version (version 22 or newer).
- Open the download and click through the installer, keeping the default choices.
Step 4: Open Claude’s settings file
On a Mac:
- Open Claude Desktop. In the menu bar at the very top of your screen, click Claude (next to the Apple logo), then Settings….
- Click Desktop app in the list on the left. Scroll down to Extensions and click Manage.
- At the bottom of that page, under Local MCP servers, click Edit config. A file named claude_desktop_config.json opens.
On Windows:
- Open Claude Desktop. Click the ☰ menu at the top left of the window, then File → Settings….
- Click Desktop app in the list on the left. Scroll down to Extensions and click Manage.
- At the bottom of that page, under Local MCP servers, click Edit config. A file named claude_desktop_config.json opens.
Using an older Claude app? There it’s Developer → Edit Config in the settings list. Can’t find it at all? Open the file directly:
- Mac: click the desktop so Finder is active, press Shift+Cmd+G, paste
~/Library/Application Support/Claude/and press Return. Open claude_desktop_config.json with TextEdit. - Windows: press Windows key + R, paste
%APPDATA%\Claude\and press Enter. Open claude_desktop_config.json with Notepad. - If the file isn’t there, create a new text file with exactly that name.
Step 5: Paste your connection
Back on the App access screen, step 2 of the card now shows your ready-made connection. You never have to type it or fix brackets by hand.
- Look at what’s in your Claude settings file, and pick the matching choice under What’s in your Claude settings file now?:
- Empty, or only {}: select everything in the file and paste over it.
- Has other settings, but no “mcpServers”: put your cursor right after the very first
{at the top, press Return, and paste. - Already has “mcpServers” (for example, you’re adding a second site): put your cursor right after
"mcpServers": {, press Return, and paste.
- Click Copy connection and paste it exactly where the screen says. Keep the comma at the end of what you paste.
- Save the file: Cmd+S on a Mac, Ctrl+S on Windows.
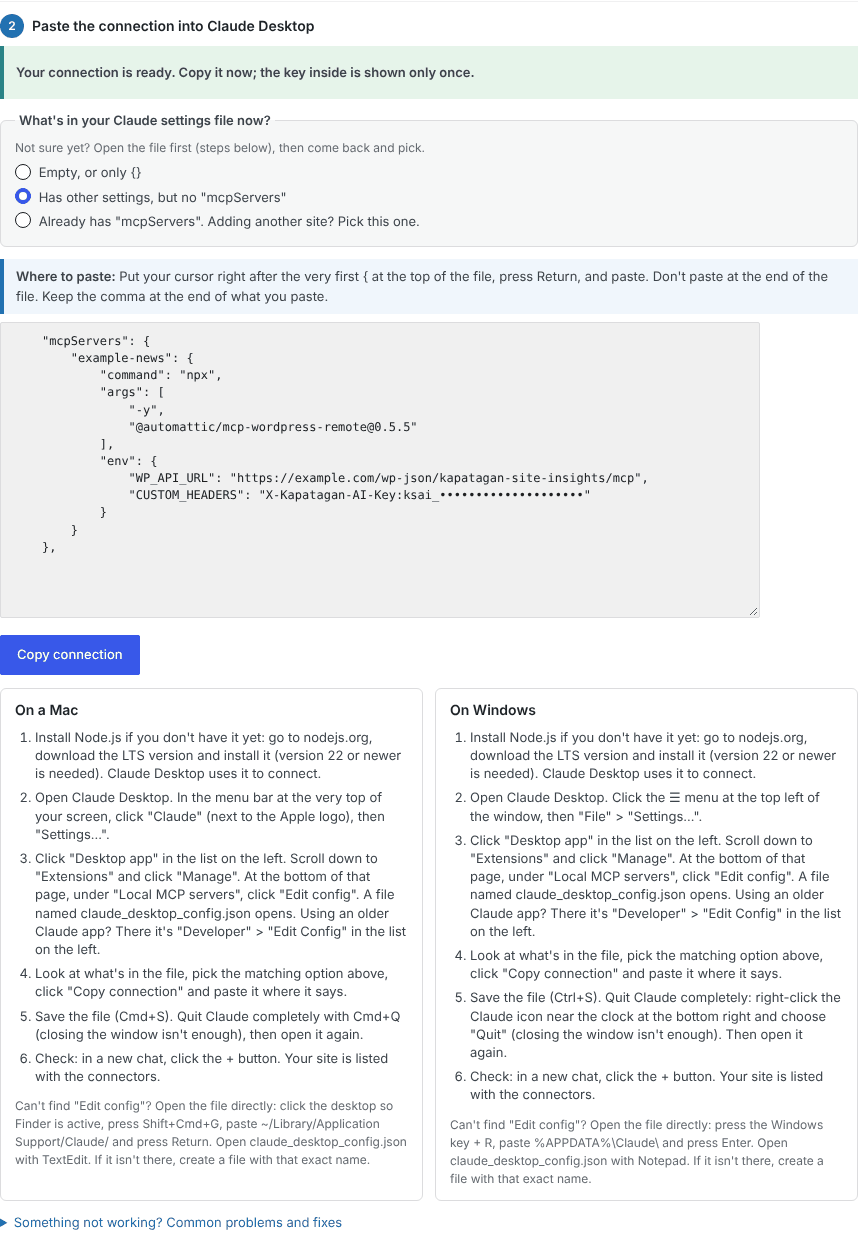
Important: the connection contains a password or key that’s shown only once. Paste it into Claude right away and don’t share it. Lost it, or setting up another computer? Click Make a new connection; the old one stops working.
Step 6: Restart Claude and check
- Quit Claude completely; closing the window isn’t enough. On a Mac press Cmd+Q. On Windows, right-click the Claude icon near the clock at the bottom right and choose Quit.
- Open Claude again, start a new chat and click the + button. Your site is listed with the connectors.
- On the App access screen, the AI account now says when it was last used by an AI app.
Step 7: Ask your first questions
The first time, Claude asks your permission to use the tools. Choose Allow. Then try:
- “Using my site insights, what’s connected on my site?”
- “Give me an overview of my site for the last 4 weeks.”
- “Which articles are losing Google clicks, and why?”
- “Which articles does Google show a lot but people rarely click? Suggest better titles.”
- “How is my article about [topic] doing?”
Adding another site
Repeat steps 1, 2 and 5 on the other site. In step 5 pick Already has “mcpServers”, so the new site goes inside the same block. A settings file can have only one “mcpServers”; Claude ignores all but the last.
5. Let other apps read your stats (optional)
If you have your own dashboard, spreadsheet or script that should read your numbers, give it an access key instead of a login:
- Go to App access → Your access key and click Make a key.
- Copy the key right away; it’s shown only once. Keep it private, like a password.
- Your app sends it in the
X-Insights-Keyheader, never in the address. The For developers section on the same screen lists every address and what it returns.
Anyone with the key can read your stats but never change anything. Drafts stay hidden unless you turn that on separately. If a key leaks, click Make a new key or Delete key.
6. Settings explained
The defaults already work well. Kapatagan Site Insights → Settings has four tabs:
- Search comparison: the day you changed something (leave empty to compare your latest weeks), how many weeks to compare (4 recommended), and your main country for engaged visits, written the way Google Analytics shows it.
- App access: turn key access on or off, allow drafts for key apps, and under Advanced, the requests allowed per minute and how long Google answers are kept.
- AI assistants: turn AI access on or off, and whether the AI may see drafts and scheduled posts (titles and dates only, never their content).
- Removal: whether deleting the plugin also deletes everything it saved. Leave it off to keep your key and settings if you reinstall.
Problems and fixes
Claude says your site “couldn’t start”, and its log says “No such file or directory”
Node.js isn’t installed, is older than version 22, or Claude can’t find it. Install the LTS version from nodejs.org, then quit Claude completely and open it again. If you installed Node.js another way (Homebrew or nvm), the Something not working? section on the App access screen shows the extra line to add.
Your site isn’t listed in Claude, with no error
Check that the settings file has only one “mcpServers”. Adding a second site is where this usually goes wrong: the new site must go inside the existing “mcpServers”. Also look for a missing comma or brace. When in doubt, undo, pick the right option on the App access screen and paste again.
The App access screen still says “Not used by an AI app yet”
Something in front of your site is stopping the AI app before it reaches WordPress, for example Cloudflare’s “Under Attack” mode or a bot-blocking rule. Your browser gets through, but the AI app can’t pass a “checking your browser” page. Add a firewall exception for the address /wp-json/kapatagan-site-insights/mcp, or ask your host to.
It worked before, but stopped after updating to 1.0
From version 1.0, Site Insights has its own AI address. In your Claude settings file, change WP_API_URL to https://yoursite.com/wp-json/kapatagan-site-insights/mcp, save, and restart Claude. Or click Make a new connection and paste the new one.
No Google numbers
Check App access → Where the numbers come from. If Search Console or Analytics says not connected, open Site Kit and reconnect it. New Site Kit connections can take a day or two to show data.
A notice says the numbers may be off
Site Insights watches Site Kit and Jetpack, and warns you when one of them stops answering or starts sending data in a shape it doesn’t expect, usually after one of them updates. Reports skip that source until it works again. Look for a Kapatagan Site Insights update, or tell us.
Staying safe
- See what the AI can read: App access → Connect your AI assistant → What the AI can read lists every report.
- Pause the AI: turn off AI access in Settings. This also deletes the AI’s sign-in right away.
- Remove it completely: click Remove AI reader account on the App access screen.
- Deactivating or deleting the plugin also deletes the AI’s sign-in.
- Your data stays yours: nothing is sent to Kapatagan. When you connect an AI assistant, the reports you ask about go to that AI company under its own privacy terms.
Still stuck? Email [email protected] with a screenshot of the App access screen (hide any keys or passwords). A real person answers, usually within two days.